Mods and Additions Update: What We Wish We'd Done Differently


Some of the links in this post are affiliate links. If you purchase a product through our link, we may receive a small compensation.
Before we launched full-time in our RV, we had a long list of modifications that we wanted done in order to make our trailer more functional. Now that we've spent almost 4 months on the road, we have a good feel for our day-to-day routine. There are always challenges to living in a small space, but simple modifications can make a big difference. In this post, we're going to talk about 3 modifications we love and 3 we wish we had done differently, or hadn't bothered to do at all.
LOVE: Vinyl flooring
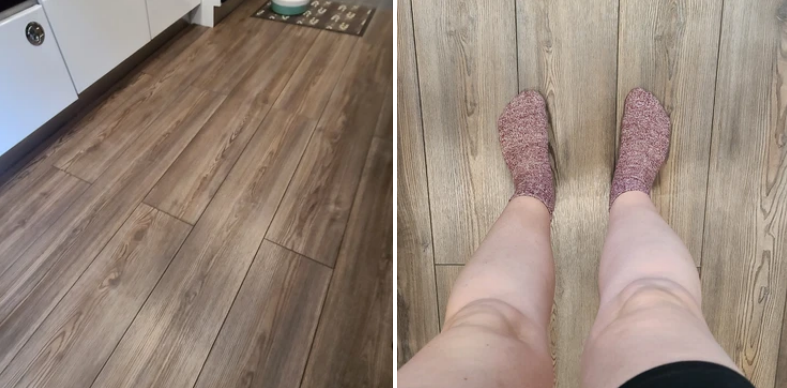
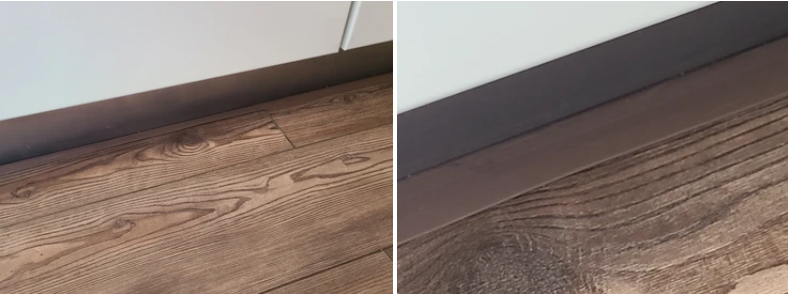
In the next post you'll get to read about how our service appointment went at the dealer, but the tech at Trailers of the East Coast raved when he saw our build-out, claiming it was the best he'd seen on an ATC Gamechanger. *Pats self on back* A big part of that is the residential flooring that we put in. It was for sure the biggest change aesthetically, but it's served many purposes. For starters, it's easy to clean. Granted, the underlying aluminum is too and can typically just be hosed down, but because we have residential furniture in our rig, we don't want to be spraying hoses everywhere. With the vinyl, we just vacuum and wet Swiffer, and all the dirt gets cleaned up. The flooring has also helped tremendously in the varying temperatures. We chose cork material as our sub-floor which serves as insulation as well as a moisture barrier, and it's kept our floor condensation levels really low. The flooring does take some maintenance, however. Because our trailer expands and contracts when temperature changes occur, we put in a floating floor that isn't glued down anywhere. Over time this can create some gaps, particularly along the edges of the floor where it meets the wall. I found an adhesive caulk strip that's typically for bathrooms, but I put some down to conceal the gaps. We love how it looks, and though it does need to be re-adhered from time to time, it's worth it to not see cork and aluminum sticking out from under our floor boards.
NOT A FAN: Drawer liners
One of the first mods we did was cutting and lining all the drawers and cabinets with drawer liner. The idea was to use it to keep items from shifting as much during travel, and to allow a little bit of insulation inside the drawers. Now that we're several thousand miles into our travels, we can safely say that we don't see much of a difference in the items shifting. We feel like we organized our cabinets well enough that things wouldn't be sliding around to begin with. In fact, if anything starts to shift, it's the drawer liner itself. When we're getting items in and out of cabinets - especially heavier items like pots and pans - the drawer liner bunches up really easily. An added annoyance is how much crumbs and metal "snowflakes" (aka the little shards of metal that jostle loose due to our rig being metal and new) stick to the liner. It's a lot harder to clean than the aluminum underneath.
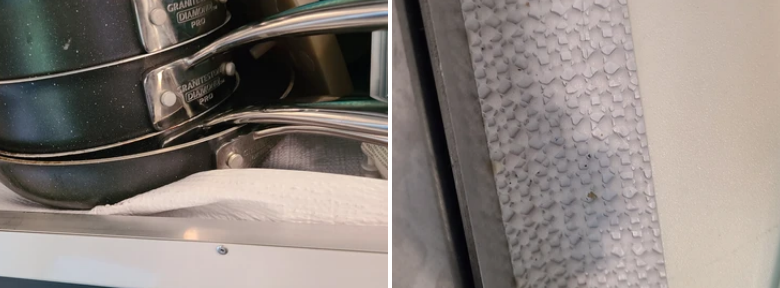
We're not saying drawer liners are a total no-no. They can be used to help cushion dishes during travel, and they seem to stick better to wood materials, so if you have a wood RV they might work better. If we were going to use drawer liners again, we'd likely try to adhere them down (though this might make cleaning them even more of a nuisance). Bottom line, don't be surprised if one day we go around ripping all the drawer liners out of all our cabinets.
LOVE: Workstation
Our workstation is now such a normal part of our daily lives that we don't think much about it, but when we do, we give ourselves major props. We built this. We had a vision of what we needed to manage working from the road, and we made it a reality. Everything about it has worked out perfectly. The hinges are staying strong, the legs attach and detach with ease, and despite a few nicks and scratches that are bound to happen with use, the tabletops are still looking quite nice! We have it bolted to the airline track behind it so that it will stay on the wheel well during travel. It's now part of our travel checklist to make sure the bolts are tight, as they do loosen in travel, but it's quick and easy and we've had no issues with it on travel days. Not to mention the storage is fantastic. If you're interested in reading more about our workstation build, you can find it here.
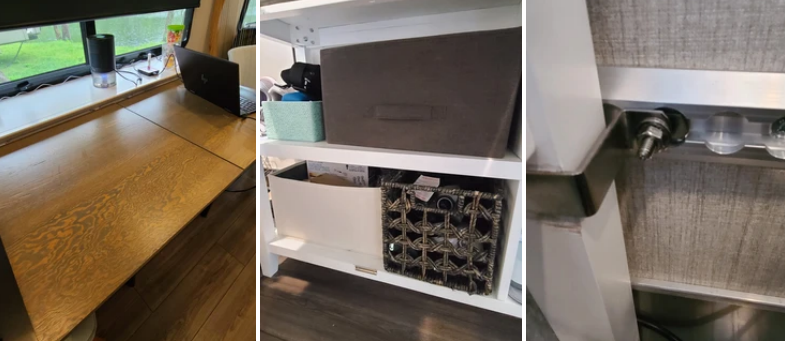
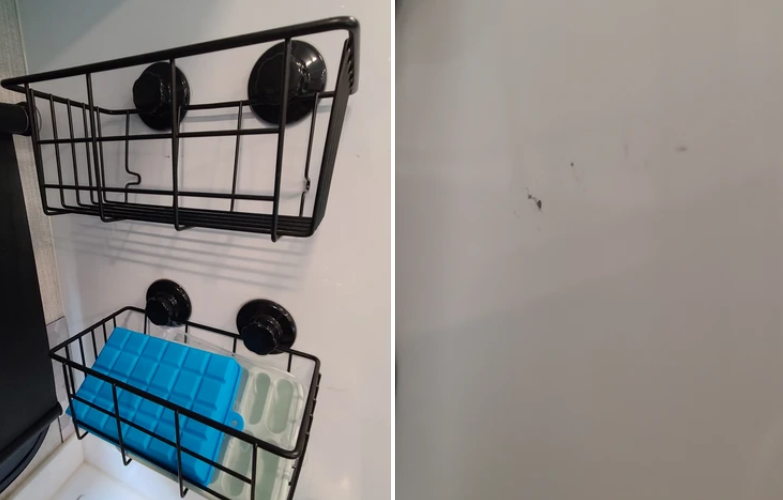
NOT A FAN: The wire kitchen baskets
Now don't get us wrong, we love having baskets next to our kitchen sink for produce, bread, and empty ice cube trays that we can't fill on travel days. They've also been a place to stick our paper towel roll so it doesn't unravel during travel. Turns out these baskets are even more practical than we ever thought...when they stay stuck to the wall! We have had the hardest time getting things to stay adhered to this wall, which is strange because we haven't had that problem anywhere else in the rig. We're not sure if it's the proximity to the fridge causing cold temps to seep through, or maybe it's just that particular panel. We started off using suction hooks we bought separately because we didn't like the half-adhesive, half-suction ones included with the baskets. The hooks worked fine for a while but then started to lose their stick. So we switched to the included hooks. They stay stuck maybe 70% of the time, which isn't terrible, but we might be on the lookout for an even heavier duty suction hook soon. The constant falling of the baskets have also caused a few chips in our wall panel paint. Not a huge deal, but we don't want an instance where a basket falls and scratches up a big chunk of panel. That's always in the back of our minds when these baskets keep falling.
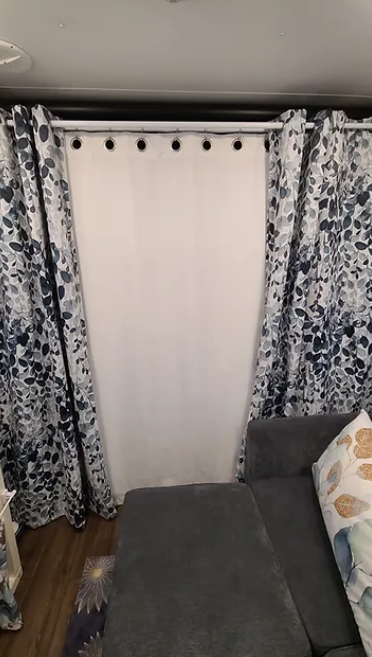
LOVE: Curtains
Recently on one of the ATC Owners Facebook groups, someone was asking for ways to further insulate the ramp door, because it contains less insulation than the other walls of the trailer. A couple of us mentioned simply hanging a curtain. I'm a huge advocate of this solution because it's simple, aesthetically pleasing, and you can still use your ramp door/patio whenever you need! The conversation went from group to private message when our friend Jessica (YouTube: Geographically Free) wanted to learn more about how we hung our curtains, and as we talked, I realized just how freaking awesome this curtain set-up is!
I took inspiration from my music studio back when we had the house. I had a curtain track system set up where I could change curtains out and create different backgrounds for my harp and meditation videos. I loved the giant, heavy duty curtain panel I used as my plain backdrop. I sometimes kept my background plain white, but sometimes I'd superimpose overlays digitally in my videos. That panel ended up serving a dual-purpose when we bought a projector and made ourselves a little home theater. Instead of a projector screen, we used the curtain.
The curtain panel also happened to be the exact right size for our rig, only it was off-white, and we decided we wanted pure white. So we bought a new one and hung it with a giant tension rod. Similar to the studio set-up, we also bought decorative curtains as our "front layer" to add a pop of color to our décor. These were hung on a second tension rod.
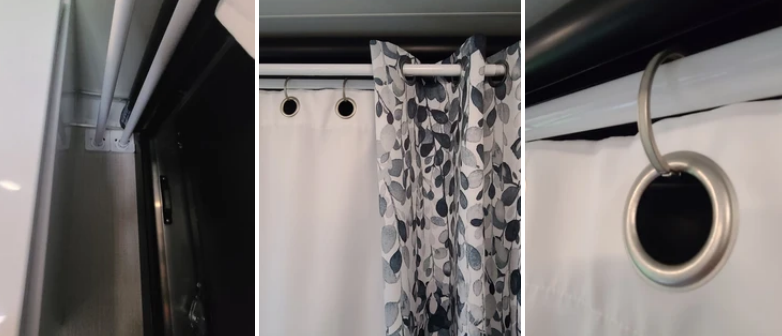
If you look closely you'll see that we hung the back panel with extra hooks. This is because we want the panel to hang flat for use as our projector screen. Otherwise, the grommets would cause the panel to be rippled. We initially used S hooks that we already had for the home studio, but they kept coming off during travel. We eventually switched to circular hooks that clasp shut, so there's nowhere for them to go in travel. 99% of the time they stay closed. The hooks we ended up getting are actually shower curtain hooks, which we bought at Target. They're a similar style to these ones, except thicker and have a magnetic clasp for easy on-off. The main feature to look for is that the clasps close entirely. It amazing what can fly when a trailer barrels down the road!
The other obstacle was figuring out if we could keep the curtains hung during travel days. Besides the rough-and-tumble voyages the trailer is put through each travel day, we also need to think about temperature fluctuations, which cause expansion and contraction in our trailer. If the width of the trailer expands too much, then tension rods will no longer hold. That's what ended up happening about half the times we traveled with the curtains hung. So the next step was to brace the curtain rods. These tension rod holders are again mainly for shower curtains, but given that they have the ability to be hung by screw or adhesive, we expected them to work on any wall material. We first tried the adhesive because we ideally don't want to put any screw holes into our wall. The adhesive held for a little while but wasn't fantastic, so the next step was to screw only one side of the holders. This is because, in case of trailer expansion in the heat, we don't want the screws ripping out of the wall if the holders are screwed on both sides. So we screwed the holders on the left side only. Since then, the curtains have held up fine, and we haven't had a travel day where they've fallen down.
NOT A FAN: Headboard upholstery
The look of our headboard upholstery is lovely. We chose a bold colored fabric with some floral details to offset the white of all our surrounding cabinets.
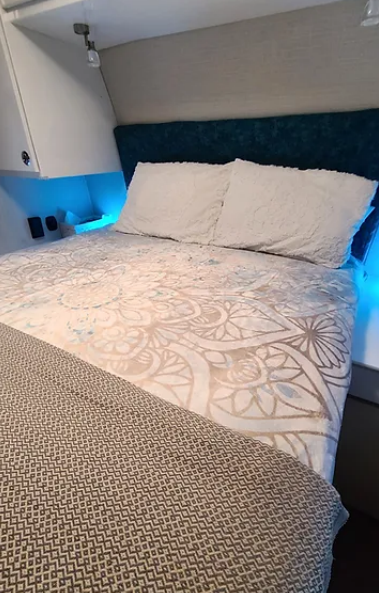
The idea was simply to tuck the fabric behind the factory headboard and let it drape over. Unfortunately, the fabric would not stay put, especially when we were moving the mattress around to make the bed. The next idea we had was to use Velcro to adhere the fabric. It held for a short while and then, before we knew it, we were constantly adjusting the fabric again. The back of the factory headboard is just a wood composite material, similar to cardboard, so we next tried staples. Those held the best, but eventually popped out. Now we have a headboard that, unless we diligently tuck it in every two minutes, looks like this:
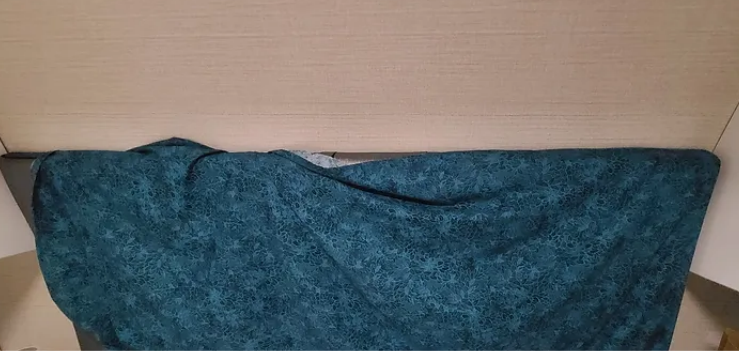
There are more solutions we can try, but most would likely involve taking off the factory headboard, which we're not ready to do. So perhaps we'll think of some other adhesive to try as a temporary solution, but until then, tucking in the headboard has become just as much a part of making the bed as tucking in the sheets.
These are only a handful of our mods, and as you've probably noticed, the ones that are giving us grief are pretty small. The big ones, like the flooring and furniture, have really worked out great, so we're thrilled. Of the mods we didn't mention here, we're pretty happy with all of them - just not over-the-moon enough to write about them. Modifications are hardly ever a one-and-done situation. There is often maintenance, updating, or other small adjustments and tweaks that need to happen. It's all simply steps we take to make our RV feel like home, and it's feeling like that more and more each day.